WSL and Miniconda

WSL
Install WSL
Open PowerShell or Windows Command Prompt in administrator mode by right-clicking and selecting "Run as administrator", enter the wsl --install command, then restart your machine. This command only works if WSL is not installed at all.

Change the default Linux distribution installed
- To install additional distributions, enter:
wsl --install -d <Distribution Name>. Replace<Distribution Name>with the name of the distribution you would like to install. - To see a list of available Linux distributions available for download through the online store, enter:
wsl --list --onlineorwsl -l -o. - If you want to install additional distributions from inside a Linux/Bash command line (rather than from PowerShell or Command Prompt), you must use
.exein the command:wsl.exe --install -d <Distribution Name>or to list available distributions:wsl.exe -l -o. - To install a Linux distribution that is not listed as available, you can download from microsoft store. Or you can import any Linux distribution using a TAR file. Or in some cases, as with Arch Linux, you can install using an
.appxfile. You can also create your own custom Linux distribution to use with WSL.
- Helper article, Before proceeding with wsl installation
- If you run into an issue during the install process, check the installation section of the troubleshooting guide.
- If you are on earlier versions please see the manual install page.
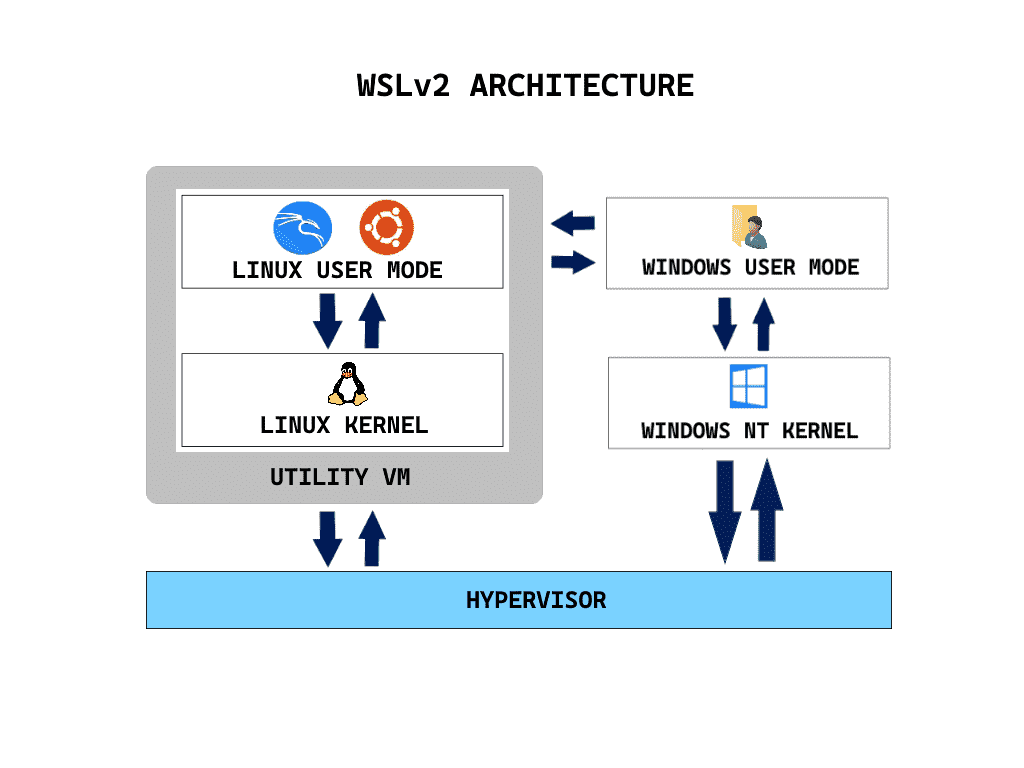
wsl1 and wsl2
Fire the below commands in Powershell
- To see whether your Linux distribution is set to WSL 1 or WSL 2, use the command:
wsl -l -v. - To change versions, use the command:
wsl --set-version <distro name> 2replacing<distro name>with the name of the Linux distribution that you want to update. If you want to change to 1, replace 2 by 1. - To set the default Linux distribution used with the wsl command, enter:
wsl -s <DistributionName>orwsl --set-default <DistributionName>, replacing<DistributionName>with the name of the Linux distribution you would like to use. - For more basic commands for WSL, you can visit
Other WSL Commands
-
wsl --list --verbose
Lists all installed WSL (Windows Subsystem for Linux) distributions with detailed information, including their state (running/stopped) and version. -
wsl --update
Updates the WSL kernel to the latest version available from Microsoft. -
wsl --shutdown
Shuts down all running WSL instances and the WSL system itself, freeing up resources. -
wsl --unregister command
wsl --unregister <Distribution Name>Uninstalls and removes the specified WSL distribution from your system. Replace<Distribution Name>with the actual name of the distribution (e.g., Ubuntu).
Troubleshooting WSL
If you encounter an error when running wsl or wsl --install, it may be due to a previous WSL installation that is corrupted or has existing issues.
# error installing wsl
C:\Windows\System32>wsl
The system cannot find the path specified.
Then, Please install Windows Subsystem for Linux (WSL) using winget, execute the following command in an elevated command prompt or PowerShell
winget install Microsoft.WSL
winget install --id=Microsoft.WSL -e
winget install: This is the basic command to install a package using winget.--id=Microsoft.WSL: This specifies the exact ID of the WSL package in the winget repository.-eor--exact: This flag ensures that winget installs the package with the exact ID provided, preventing potential ambiguity with similar package names- UI for winget: https://winget.run/
Comparing WSL Versions

Checking Ubuntu Version
Fire the below commands in ubuntu (WSL)
lsb_releaseCommand to Show Ubuntu Versio - Linux Standard Base(LSB)lsb_release -a(all),lsb_release -d(description),lsb_release -dc
cat /etc/lsb-releaseis another waycat /etc/*releaseto print full lineupcat /etc/os-releaseto display the contents of the os-release filehostnamectlto show the host machine’s details- When you connect to a remote machine via SSH, the remote system often prints a message that’s stored in the /etc/issue file. If you have access to the machine, you can display the contents of this file to get the Ubuntu version
cat /etc/issueandcat /etc/issue.net
- screenfetch is a very interesting script that displays system information in the terminal. It’s popular because of the concise information output and a great-looking ASCII image.
sudo apt install screenfetch -y
screenfetch - neofetch is a more modern version of the screenfetch Bash script. In addition to showing system information, it also displays a color palette underneath the itemized list.
sudo apt install neofetch -y
neofetch
Checking CPU Information
lscpu
# or
cat /proc/cpuinfo
- Processor Architecture:
uname -m - Processor Model:
lscpu | grep -i "Model name:" | cut -d':' -f2- -
Setting up nodejs with nvm on WSL
Install NVM via bash shell (WSL) as below:
curl -o- https://raw.githubusercontent.com/nvm-sh/nvm/v0.39.7/install.sh | bash
wget -qO- https://raw.githubusercontent.com/nvm-sh/nvm/v0.39.7/install.sh | bash
( Note: instead of v0.38.0 Use the latest version of nvm from GitHub)
Verify your installation using
command -v nvm
nvm install --ltsto install the latest LTS,nvm install nodeto install the latest versionnvm lsornvm listto check all the installed node versionsnvm install 12.18.3ornvm install 20to install particular versionsnvm use 20to change to node version 20nvm ls-remoteto list available versions online to be installed
- Set default node version
nvm alias default node # this refers to the latest installed version of node
nvm alias default 18 # this refers to the latest installed v18.x version of node
nvm alias default 18.12  # this refers to the latest installed v18.12.x version of node
For more help related to nvm
Then we can use node as normally as below:
npm install --global yarnornpm i -g yarnto install yarn globallynpm install -g @angular/clito install Angular CLI globallynpm install <package-name> --save-devornpm i -D <package-name>,yarn add <package-name> –devoryarn add -D <package-name>to install package under devDependenciesnpm installornpm ioryarn installoryarnto install all dependencies present inpackage.json- consider the below
package.json.
{
  "name": "wiki",
  "version": "0.0.0",
  "scripts": {
    "docusaurus": "docusaurus",
    "start": "docusaurus start",
    "serve": "docusaurus serve",
  }
}
npm run serveoryarn serveoryarn run serveto executeservecommand present inside the file. Other commands also follow the same way.
Miniconda
Some of the popular virtual environment implementations for Python are:
- Virtualenv, Conda, pipenv, venv and several others exist. However the most popular ones are Conda, Pipenv and venv as well. Specifically, Conda is popular amongst Data Scientists whereas pipenv is popular amongst software engineers.
- Conda is a package manager and a virtual environment and it provides the convenience of allowing you to manage what version of Python the virtual environment (and as a result your project) uses as well. So naturally, conda is very convenient and I use it my projects as well.

Install miniconda
- Download Miniconda Installer
wget https://repo.anaconda.com/miniconda/Miniconda3-latest-Linux-x86_64.sh -O /opt/miniconda-installer.sh
sudo wget https://repo.anaconda.com/miniconda/Miniconda3-latest-Linux-x86_64.sh -O /opt/miniconda-installer.sh
The Miniconda installer script has been downloaded and saved as miniconda-installer.sh at the location /opt
- Install Miniconda
bash /opt/miniconda-installer.sh
Follow the instructions shown on the screen. We need to press ENTER to review the license agreement. Keep pressing ENTER or SPACE to finish it. , At the end of the agreement, you will be asked to accept the license terms or not. Type yes to accept and continue. And continue till you see Thank you for installing Miniconda3!
- Configure Miniconda
After the Miniconda installation, we need to apply the changes made to ~/.bashrc file. Miniconda installer modified the file during the installation. Let’s execute the command.
source ~/.bashrc
Now, at this point, you can run this command to check your Miniconda information.
conda info
conda install package-nameto install a Python package. So, if you want to install pandas, you can runconta install pandas- to exit from the conda environment,
conda deactivate
Create conda environment
Conda centrally manages the environments you create, so, you don’t have to bother about creating a folder for specific environments yourself. You can either start by creating an empty environment or mention the python version and packages you need at the time of creation itself.
- Create an empty environment
conda create --name {env_name}
conda create --name myenv
- Create an environment + specific python version
conda create --name {env_name} {python==3.7.5}
conda create --name myenv python==3.7.5
This will also install packages like pip, wheel, setuptools. You can then activate the environment (see below) and
- Create an environment + specific Python version + packages
conda create --name env_name python==3.7.5 package_name1 package_name2
example
conda create --name myenv python==3.7.5 pandas numpy
Activate the environment
conda activate {env_name}
To deactivate whichever you are currently in, use:
conda deactivate
Install more packages
Once activated you can install more packages using either conda or with pip.
With Conda
conda install pkg_name1==1.x.y pkg_name2==1.x.y
With pip
pip install pkg_name2==1.x.y pkg_name2==1.x.y
or install multiple packages from requirements.txt.
pip install -r requirements.txt
Channel in Conda
A channel is the location where packages are stored remotely.
When you install Conda for the first time, it comes with a channel called default. You can check that using the command below:
conda config --show channels
- To install a package using the
defaultchannel, you use theconda installcommand followed by the<package_name>. That is:conda install package-name
Although numerous packages can be installed from the default channel, it's possible to come across packages that are not accessible from it.
In cases like this, you'd usually get the "PackagesNotFoundError: The following channels are not available from current channels" error message.
- How To Install a Package in Conda Using a Channel Name
conda install -c some-channel packagename
# or
conda install some-channel::packagename
examples
conda install -c conda-forge matplotlib
conda install scipy --channel conda-forge --channel bioconda
You may specify multiple channels by passing the argument multiple time Priority decreases from left to right - the first argument is higher priority than the second.
-
The
-cor--channelflag denotes the word channel. -
conda-forgedenotes the name of the channel wherematplotlibwas installed from. -
Although we installed Matplotlib from
conda-forge, conda-forge will not be added to our list of channels. -
So if you run the
conda config --show channelscommand, you'd only see thedefaultchannel. -
You can add a channel to the list of channels using the
conda config --add channels channel-namecommand. That is:
conda config --add channels conda-forge
The command above will add conda-forge to the list of Conda channels. This means that you don't have to specify the channel name if you are installing a package that is available from the conda-forge channel.
Some of the channels are: anaconda, conda_forge, r, bioconda and defaults
Check the list of packages and environments
- See list of environments
conda env list
# or
conda info --envs
- Show list of packages in current environment
conda list - See list of packages in specific environment
conda list -n myenv - Rename an existing environment
conda rename -n old_env new_env
Change 'base' environment permanently to a different environment 'myenv' at startup
conda create --name myenv
conda activate myenv
echo "conda activate myenv" >> ~/.bashrc
Generating a new SSH key
Step 1 — Open your Terminal
Step 2 — Generate the key pair
Run the command below, substituting your GitHub email address:
ssh-keygen -t ed25519 -C "your_email@example.com"
If your system does not support the Ed25519 algorithm, use RSA instead:
ssh-keygen -t rsa -b 4096 -C "your_email@example.com"
Step 3 — Set a secure passphrase
When prompted, enter a strong passphrase and confirm it:
> Enter passphrase (empty for no passphrase): [Type a passphrase]
> Enter same passphrase again: [Type passphrase again]
Step 4 — Copy the public key
Print your public key to the terminal and copy it to your clipboard:
cat ~/.ssh/id_ed25519.pub
Copy the output exactly — do not include any leading/trailing newlines or extra whitespace.
Step 5 — Add the key to GitHub
Navigate to:
Profile picture → Settings → SSH and GPG keys → New SSH key
Paste your public key into the Key field and save.
Resources
- How to Install Miniconda on Ubuntu 22.04
- Conda create environment and everything you need to know to manage conda virtual environment
- Anaconda change 'base' environment permanently to a different environment 'myenv' to startup at terminal openings
- Using default repositories - official
- Explanation of different conda channels - stackoverflow
- Generating a new SSH key and adding it to the ssh-agent